Welcome to roboslyq's blog
IT技能成长的印记-
SpringCloud应用系列(3.2) feign负载均衡
1.文章列表
2. 项目依赖
- 注册中心:spring-cloud-eureka
- 服务提供者:spring-cloud-eureka-client
- 服务消费者: spring-cloud-feign-client
3.Feign消费端环境搭建
3.1 依赖导入
<dependency>
    <groupId>org.springframework.cloud</groupId>
    <artifactId>spring-cloud-starter-netflix-eureka-client</artifactId>
</dependency>
<dependency>
    <groupId>org.springframework.cloud</groupId>
    <artifactId>spring-cloud-starter-openfeign</artifactId>
</dependency>
3.2 修改启动引导类
package com.springcloudribbonclient;

import org.springframework.boot.SpringApplication;
import org.springframework.boot.autoconfigure.SpringBootApplication;
import org.springframework.cloud.client.discovery.EnableDiscoveryClient;
import org.springframework.cloud.client.loadbalancer.LoadBalanced;
import org.springframework.cloud.openfeign.EnableFeignClients;
import org.springframework.context.annotation.Bean;
import org.springframework.web.client.RestTemplate;

@SpringBootApplication
//@EnableDiscoveryClient
@EnableFeignClients
public class SpringCloudRibbonClientApplication {
	public static void main(String[] args) {
		SpringApplication.run(SpringCloudRibbonClientApplication.class, args);
	}
}
3.3 创建具体消费类
package com.springcloudribbonclient.service;

import org.springframework.cloud.openfeign.FeignClient;
import org.springframework.web.bind.annotation.RequestMapping;
import org.springframework.web.bind.annotation.RequestMethod;
//Feign注解,value为服务提供者的serviceId
@FeignClient(value = "SPRING-CLOUD-EUREKA-CLIENT")
public interface FeignServiceDemo {
    //配置服务提供者的URI及相关参数,此注解与SpringMVC通用
    @RequestMapping(value = "/hello", method = RequestMethod.GET, produces = "application/json; charset=UTF-8")
    String hello1();
}
此类不需要具体实现,具体实现由代理技术生成
3.4 创建控制器类
package com.springcloudribbonclient.controller;

import com.springcloudribbonclient.service.FeignServiceDemo;
import org.springframework.beans.factory.annotation.Autowired;
import org.springframework.web.bind.annotation.GetMapping;
import org.springframework.web.bind.annotation.RestController;
import org.springframework.web.client.RestTemplate;

@RestController
public class ConsumerController {
    //注入接口
    @Autowired
    private FeignServiceDemo feignServiceDemo;

    @GetMapping(value = "/hello1")
    public String hello1() {
        String result = feignServiceDemo.hello1();
        System.out.println("feigh:"+result);
        return  result;
    }
}
1、控制器类请求路径为
/hello1。2、控制器类通过
feignServiceDemo来调用服务器提供的相应服务。3.4 application.properties配置
#应用名称
spring.application.name = feign-consumer
#端口号
server.port=9000
#注册中心的地址
eureka.client.serviceUrl.defaultZone=http://localhost:8082/eureka/
-
JDK常见源码分析(1)Object
Object
Object对象是Java中所有对象的父类 。一共有12个方法。源码如下(JDK1.8):
package java.lang;

public class Object {
    public Object() {
    }
    //native方法
    private static native void registerNatives();
	//native方法
    public final native Class<?> getClass();
	//native方法
    public native int hashCode();

    public boolean equals(Object var1) {
        return this == var1;
    }
	//native方法
    protected native Object clone() throws CloneNotSupportedException;

    public String toString() {
        return this.getClass().getName() + "@" + Integer.toHexString(this.hashCode());
    }
	//native方法
    public final native void notify();
	//native方法
    public final native void notifyAll();
	//native方法
    public final native void wait(long var1) throws InterruptedException;
	//wait() 需要被try catch包围,中断也可以使wait等待的线程唤醒。
    public final void wait(long timeout, int nanos) throws InterruptedException {
        if (timeout < 0) {
            throw new IllegalArgumentException("timeout value is negative");
        }
        if (nanos < 0 || nanos > 999999) {
            throw new IllegalArgumentException(
                                "nanosecond timeout value out of range");
        }
        if (nanos > 0) {
            timeout++;
        }
        wait(timeout);
    }

    public final void wait() throws InterruptedException {
        this.wait(0L);
    }

    protected void finalize() throws Throwable {
    }

    static {
        registerNatives();
    }
}
-
个人计划 2019年技术学习
2019-03-092019年技术学习
时光如梭,大学的时光仿佛就像昨天,还历历在目,可实际上已经过去了八年之久。回首这过去八年,发现自己竟然没有留下什么有价值的东西。牛顿曾经说过:我看得远,是因为我站在巨人的肩膀上。虽然我不是什么巨人,只是一枚普普通过的老程序员,但还是希望将自己的经历经验记录下来,希望有缘人有机会可以看到对其有些帮助。至少是对自己过去的经验作一个总结,为后续的工作提供更好的发展。
山外山,天外天,自己自是一个普通的程序员。要自信但也不要自大。。
思想,是编程的核心。而知识的积累是思想的源泉。脚踏实地,做好技术。
本文主要是自己作的Java体系相关的技术。希望2019年能在基础方面有很好的提高。一切高深的技术源于基础,源于基本的算法。所以数据结构与算法,设计模式等是一切框架的基础。因此19年优先打好基础,但同时也要把握住技术趋势,知道技术发展方向。
形成自己的知识体系,进行总结,根据总结不断发散知识的知识体系
SpringCloud及Spring学会使用及背后源码阅读,了解其运行原理
比如eureka内部怎么保证强一致性,springcloud服务降级组件与原理
动态网关zuul原理
robbion负载均衡有几种
mysql同步原理
暂定基础
- (Java8)JDK常见类实现源码分析
- Java8 Stream编程
- React编程
- Java反射
- Java运行时内存模型
- Java GC
- Java字节码指令
- Java Classic文件组成结构
- Java字节码操作工具(javassit)
- 反射与AspectJ
- 枚举与泛型原理
- ThreadLocal使用
- JDK编译
- 性能监控及分析
设计模式
23种常见设计模式及应用
算法与数据结构
操作系统原理
-
SpringCloud应用系列(3.1) ribbon服务调用
1.文章列表
2. 项目依赖
- 注册中心:spring-cloud-eureka
- 服务提供者:spring-cloud-eureka-client
- 服务消费者: spring-cloud-ribbon-client
3.服务端环境搭建
3.1 依赖导入
<dependency>
    <groupId>org.springframework.cloud</groupId>
    <artifactId>spring-cloud-starter-netflix-eureka-client</artifactId>
</dependency>
<dependency>
    <groupId>org.springframework.cloud</groupId>
    <artifactId>spring-cloud-starter-netflix-ribbon</artifactId>
</dependency>
3.2 修改启动引导类
package com.springcloudribbonclient;

import org.springframework.boot.SpringApplication;
import org.springframework.boot.autoconfigure.SpringBootApplication;
import org.springframework.cloud.client.discovery.EnableDiscoveryClient;
import org.springframework.cloud.client.loadbalancer.LoadBalanced;
import org.springframework.cloud.openfeign.EnableFeignClients;
import org.springframework.context.annotation.Bean;
import org.springframework.web.client.RestTemplate;

@SpringBootApplication
@EnableDiscoveryClient
public class SpringCloudRibbonClientApplication {
	@Bean //定义REST客户端,RestTemplate实例
	@LoadBalanced//开启负债均衡的能力
	RestTemplate restTemplate() {
		return new RestTemplate();
	}
	public static void main(String[] args) {
		SpringApplication.run(SpringCloudRibbonClientApplication.class, args);
	}
}
3.3 创建控制器类
package com.springcloudribbonclient.controller;

import org.springframework.beans.factory.annotation.Autowired;
import org.springframework.web.bind.annotation.GetMapping;
import org.springframework.web.bind.annotation.RestController;
import org.springframework.web.client.RestTemplate;

@RestController
public class ConsumerController {
    @Autowired
    private RestTemplate restTemplate;
    @GetMapping(value = "/hello")
    public String hello() {
        return restTemplate.getForEntity("http://SPRING-CLOUD-EUREKA-CLIENT/", String.class).getBody();
    }
}
1、控制器类请求路径为
/hello2、控制器类通过
RestTemplate指定服务提供者的路径http://SPRING-CLOUD-EUREKA-CLIENT/。其中SPRING-CLOUD-EUREKA-CLIENT为服务提供者的应用名称。即spring.application.name属性对应的名称。3.4 application.properties配置
#应用名称
spring.application.name=spring-cloud-ribbon-client
#端口号
server.port=8084
#注册中心的地址
eureka.client.serviceUrl.defaultZone=http://localhost:8082/eureka/
3.4 启动测试
3.4.1 服务注册
访问测试路径:
http://localhost:8082/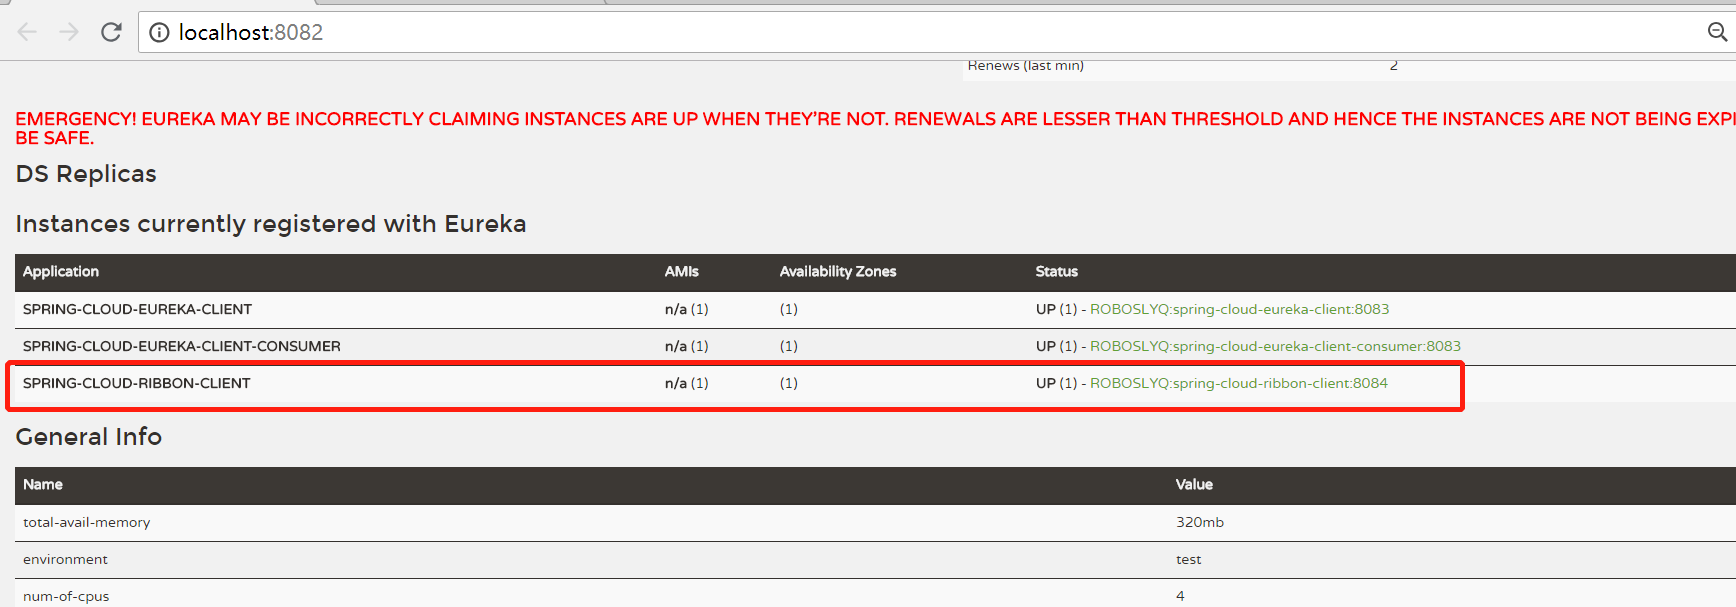
3.4.2 服务调用
访问测试路径:
http://localhost:8084/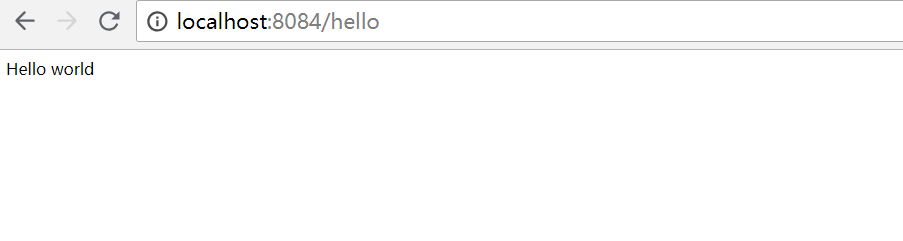
4. 负载均衡实现
在前端的基础上,修改服务服务提供者的端口,启动多个提供者。然后再进行消费。
4.1 修改服务提供者代码
package com.roboslyq.springcloudeurekaclient;

import org.springframework.beans.factory.annotation.Autowired;
import org.springframework.beans.factory.annotation.Value;
import org.springframework.boot.SpringApplication;
import org.springframework.boot.autoconfigure.SpringBootApplication;
import org.springframework.cloud.client.ServiceInstance;
import org.springframework.cloud.client.discovery.DiscoveryClient;
import org.springframework.cloud.client.discovery.EnableDiscoveryClient;
import org.springframework.web.bind.annotation.RequestMapping;
import org.springframework.web.bind.annotation.RequestMethod;
import org.springframework.web.bind.annotation.RestController;

import java.util.List;

@SpringBootApplication
//启用服务发瑞客户端
@EnableDiscoveryClient
@RestController
public class SpringCloudEurekaClientApplication {
	@Value("${server.port}")
	private int serverPort;
	//测试请求使用
	@RequestMapping(value ="/hello",method = RequestMethod.GET)
	public String home() {
		return  "hello:" + serverPort;
	}
	public static void main(String[] args) {
		SpringApplication.run(SpringCloudEurekaClientApplication.class, args);
	}

}
注入当前启动服务的端口,并且返回给调用者。调用者可以通过端口区分具体调用了哪个服务提供者。
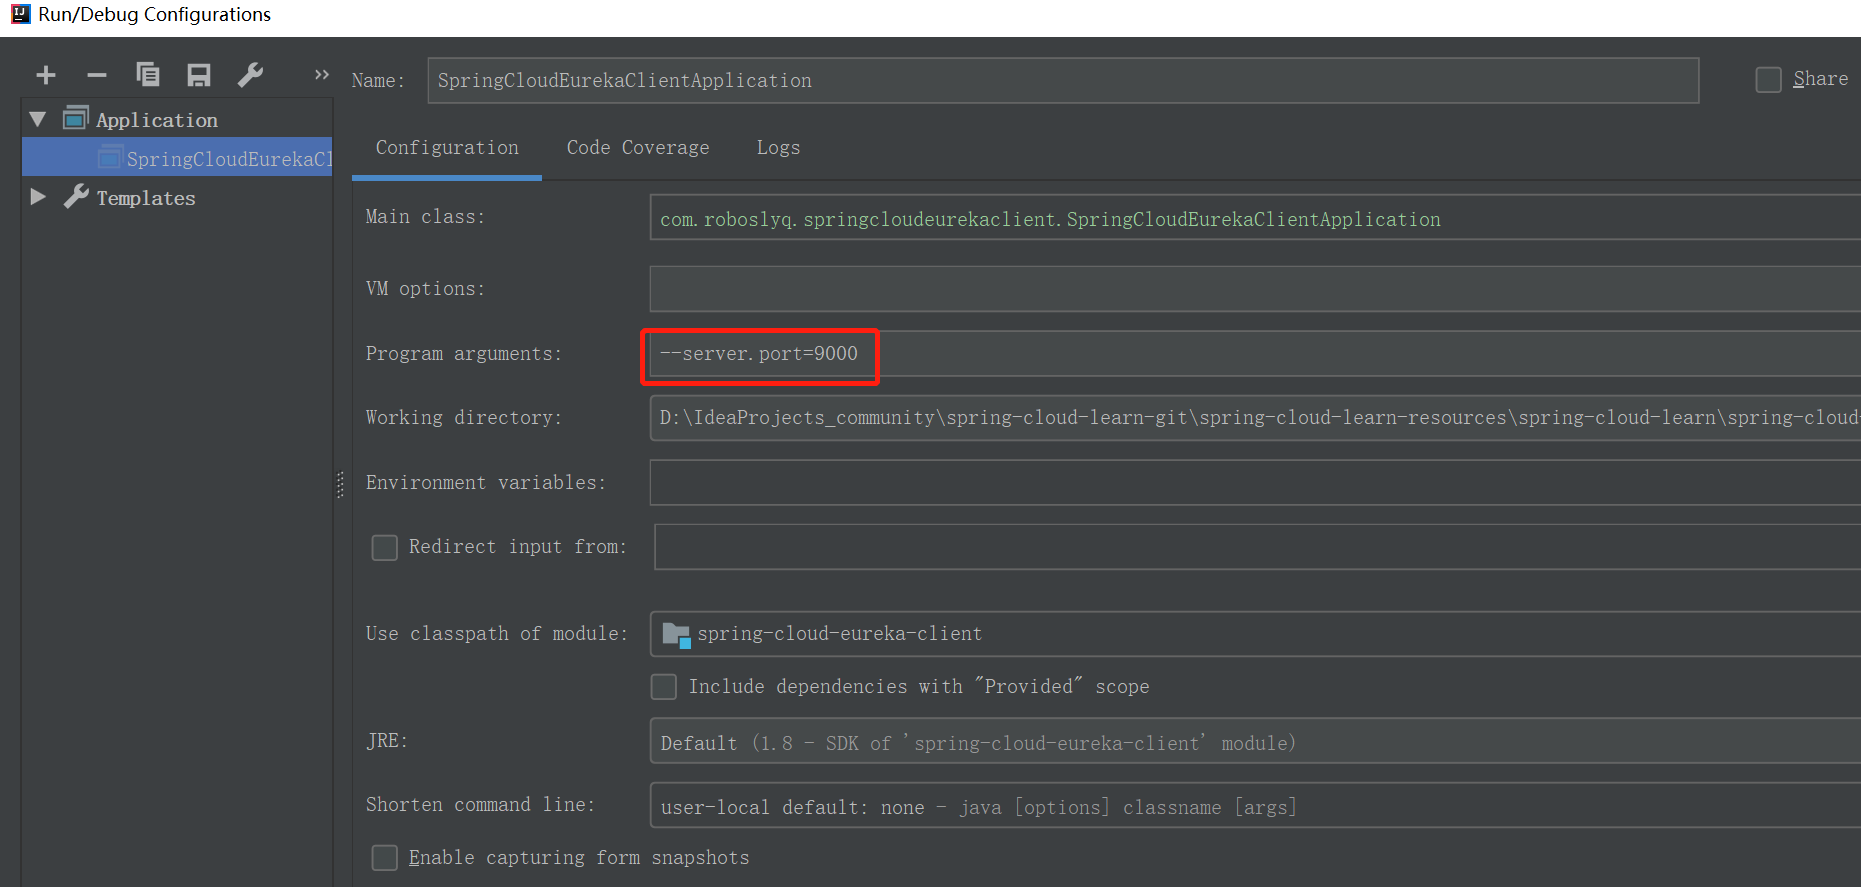
## 4.2 调整服务提供启动端口
可以通过mvn工具打成jar包,然后指定启动端口。或者直接在IDEA,修改启动端口,如下图所示:
4.3 调整消费消费代码
package com.springcloudribbonclient.controller;

import org.springframework.beans.factory.annotation.Autowired;
import org.springframework.web.bind.annotation.GetMapping;
import org.springframework.web.bind.annotation.RestController;
import org.springframework.web.client.RestTemplate;

@RestController
public class ConsumerController {
    @Autowired
    private RestTemplate restTemplate;

    @GetMapping(value = "/hello")
    public String hello() {
        String result = restTemplate.getForEntity("http://SPRING-CLOUD-EUREKA-CLIENT/hello", String.class).getBody();
        System.out.println(result);
        return  result;
    }
}
添加打印代码,打印服务提供者返回信息
4.4测试结果

由结果可见,对服务提供者实现比较均衡的轮询调用。
-
SpringCloud应用系列(2)eureka服务治理
1.文章列表
2. 服务端环境搭建
环境搭建具体步骤请参考本系列文章第一篇SpringCloud应用系列(1)config配置中心。
2.1 依赖导入
<dependency>
    <groupId>org.springframework.cloud</groupId>
    <artifactId>spring-cloud-starter-netflix-eureka-server</artifactId>
</dependency>
2.2 修改启动引导类
package com.roboslyq.springcloudeureka;

import org.springframework.boot.SpringApplication;
import org.springframework.boot.autoconfigure.SpringBootApplication;
import org.springframework.cloud.netflix.eureka.server.EnableEurekaServer;

@SpringBootApplication
//启用eureka注册中心
@EnableEurekaServer
public class SpringCloudEurekaApplication {

	public static void main(String[] args) {
		SpringApplication.run(SpringCloudEurekaApplication.class, args);
	}

}
2.3 application.properties配置
#应用名称
spring.application.name = spring-cloud-eureka
#应用端口
server.port = 8082

#actuator配置
management.endpoint.enable-by-default = false
management.endpoint.env.enabled=true
management.endpoint.health.enabled=true
management.endpoint.info.enabled=true
management.endpoints.web.exposure.include = env

#eureka相关配置
eureka.instance.hostname = localhost
#registerWithEureka=true ,自已会注册
eureka.client.registerWithEureka = false
#如果fetch-registry = true , 则去Eureka Server拉取注册信息
eureka.client.fetchRegistry = false
eureka.client.serviceUrl.defaultZone = http://${eureka.instance.hostname}:${server.port}/eureka/
2.4 启动测试
访问测试路径:
http://localhost:8082/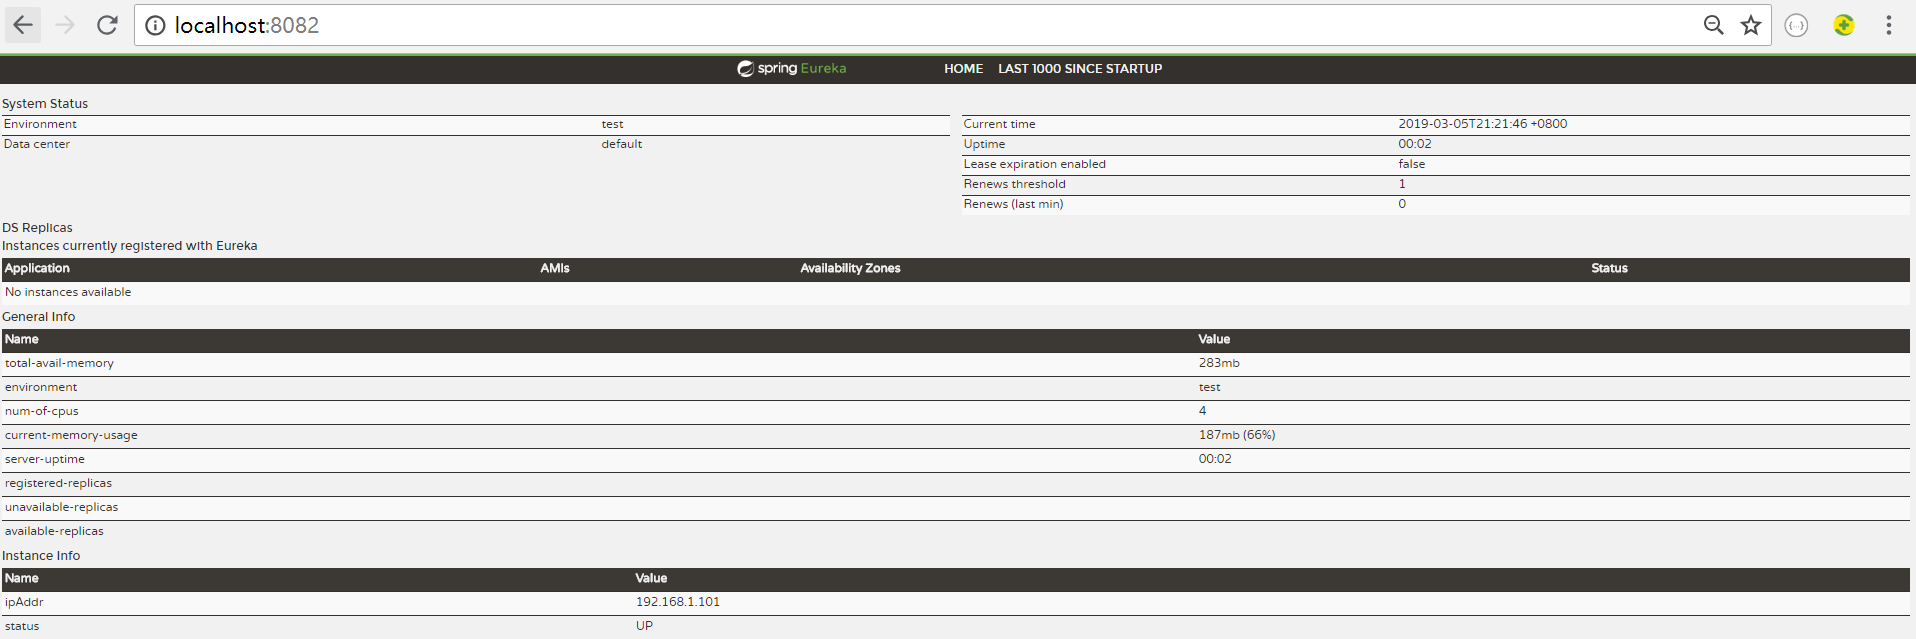
3 客户端环境搭建
3.1 依赖导入
<dependency>
	<groupId>org.springframework.cloud</groupId>
	<artifactId>spring-cloud-starter-netflix-eureka-client</artifactId>
</dependency>
3.2 修改启动引导类
package com.roboslyq.springcloudeurekaclient;

import org.springframework.boot.SpringApplication;
import org.springframework.boot.autoconfigure.SpringBootApplication;
import org.springframework.cloud.client.discovery.EnableDiscoveryClient;
import org.springframework.web.bind.annotation.RequestMapping;
import org.springframework.web.bind.annotation.RestController;

@SpringBootApplication
//启用服务发瑞客户端
@EnableDiscoveryClient
@RestController
public class SpringCloudEurekaClientApplication {
	//测试请求使用
	@RequestMapping("/hello")
	public String home() {
		return "Hello world";
	}
	public static void main(String[] args) {
		SpringApplication.run(SpringCloudEurekaClientApplication.class, args);
	}

}
3.3 修改配置文件
spring.application.name = spring-cloud-eureka-client
server.port = 8083
#配置注册中心地址
eureka.client.serviceUrl.defaultZone = http://localhost:8082/eureka/
3.4 启动测试
刷新服务端测试路径:
http://localhost:8082/
此图表明服务已经注册成功。
-
SpringCloud应用系列(1)config配置中心
1. 前言
本系列文章主要是以环境搭建实操为主,后续会有单独的系列来分析具体的实现原理。
本篇是本系列的文章第一篇,因此讲得有点啰嗦,一些细节操作问题会有提到。后续文章会化繁为简,一些基本的
操作可以参考此篇文章。
2. config server端环境搭建
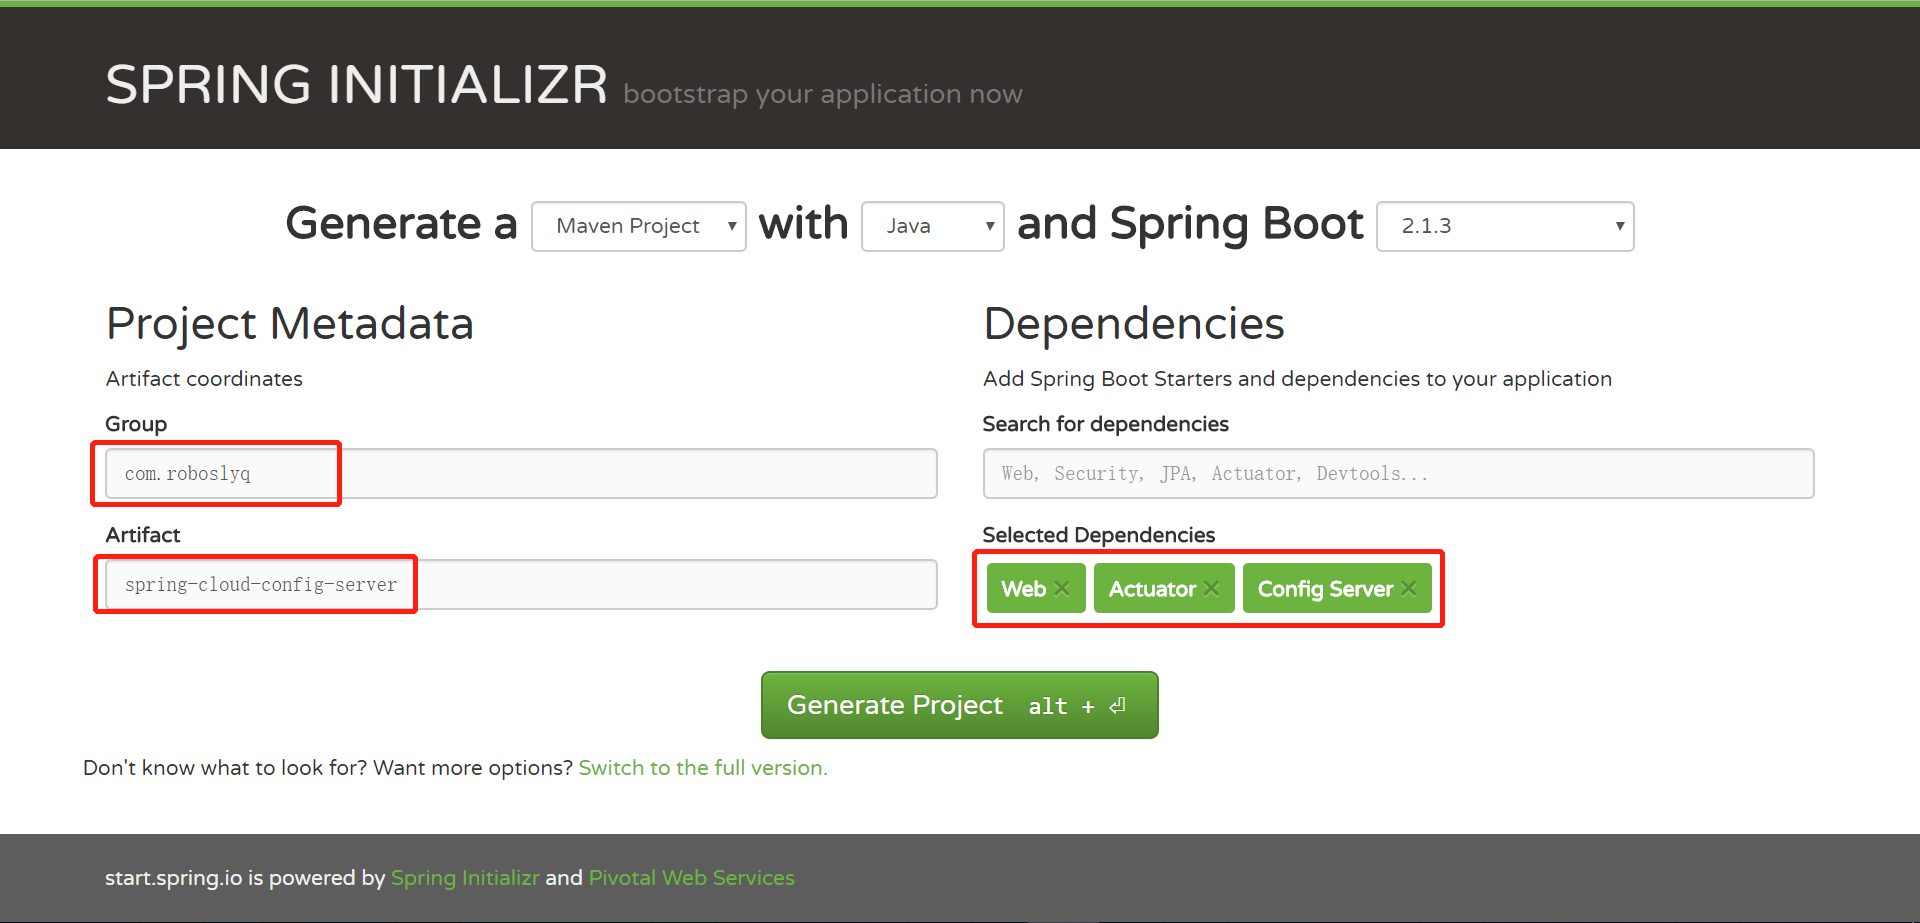
2.1 SPRING INITIALIZR
如果是从0开始搭建springBoot(springCloud基于springboot搭建)相关项目,强烈推荐SPRING INITIALIZR。打开网站,如下图所示:

Generate a XXX with YYY and Spring Boot ZZZ 其中XXX指使用Gradle还是Maven进行项目管理。YYY指创建的项目语言是Java,Kotlin或Groovy。ZZZ是指具体的Spring boot版本。 Spring boot版本一旦确定之后,其它相关依赖也相关确定了。
我们选择录入相关信息如下: Group = com.roboslyq Artifact = spring-cloud-config-server Dependencies = Web Actuator Config Server
最后点击”Generate Project”即可生成相应的项目。
2.2 导入IDEA
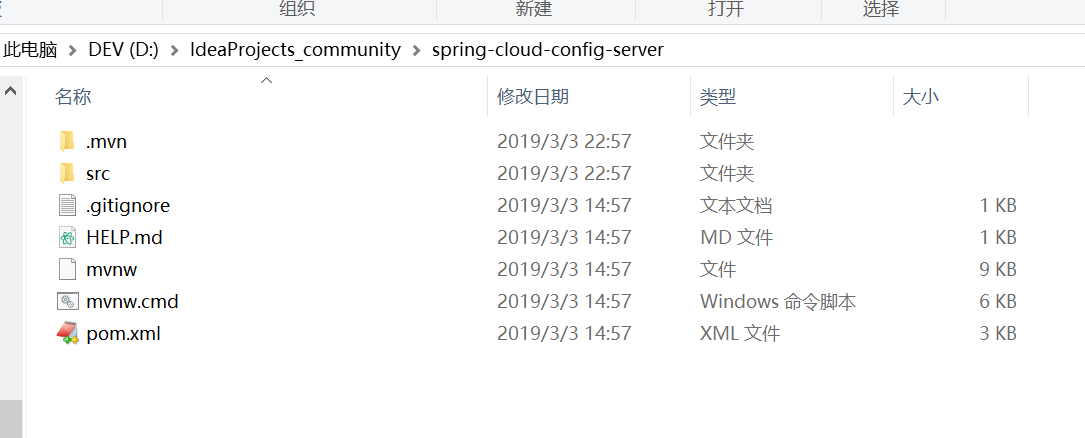
2.2.1 项目结构
解压上面生成的压缩包,目录结构如下:
2.2.2 POM依赖
将其导入IDEA(在IDEA中直接打开pom.xml文件即可)
<?xml version="1.0" encoding="UTF-8"?>
<project xmlns="http://maven.apache.org/POM/4.0.0" xmlns:xsi="http://www.w3.org/2001/XMLSchema-instance"
	xsi:schemaLocation="http://maven.apache.org/POM/4.0.0 http://maven.apache.org/xsd/maven-4.0.0.xsd">
	<modelVersion>4.0.0</modelVersion>
	<!-- 标准的Spring boot项目 -->
	<parent>
		<groupId>org.springframework.boot</groupId>
		<artifactId>spring-boot-starter-parent</artifactId>
		<version>2.1.3.RELEASE</version>
		<relativePath/> <!-- lookup parent from repository -->
	</parent>
	<groupId>com.roboslyq</groupId>
	<artifactId>spring-cloud-config-server</artifactId>
	<version>0.0.1-SNAPSHOT</version>
	<name>spring-cloud-config-server</name>
	<description>Demo project for Spring Boot</description>
	<!-- 指定Java编译版本及SpringCloud版本 -->
	<properties>
		<java.version>1.8</java.version>
		<spring-cloud.version>Greenwich.RELEASE</spring-cloud.version>
	</properties>
	<dependencies>
		<!-- actuator依赖导入  -->
		<dependency>
			<groupId>org.springframework.boot</groupId>
			<artifactId>spring-boot-starter-actuator</artifactId>
		</dependency>
		<!-- spring mvc导入-->
		<dependency>
			<groupId>org.springframework.boot</groupId>
			<artifactId>spring-boot-starter-web</artifactId>
		</dependency>
		<!-- 配置中心服务器依赖-->
		<dependency>
			<groupId>org.springframework.cloud</groupId>
			<artifactId>spring-cloud-config-server</artifactId>
		</dependency>
		<dependency>
			<groupId>org.springframework.boot</groupId>
			<artifactId>spring-boot-starter-test</artifactId>
			<scope>test</scope>
		</dependency>
	</dependencies>
	<dependencyManagement>
		<dependencies>
			<dependency>
				<groupId>org.springframework.cloud</groupId>
				<artifactId>spring-cloud-dependencies</artifactId>
				<version>${spring-cloud.version}</version>
				<type>pom</type>
				<scope>import</scope>
			</dependency>
		</dependencies>
	</dependencyManagement>
	<build>
		<plugins>
			<plugin>
				<groupId>org.springframework.boot</groupId>
				<artifactId>spring-boot-maven-plugin</artifactId>
			</plugin>
		</plugins>
	</build>
	<repositories>
		<repository>
			<id>spring-milestones</id>
			<name>Spring Milestones</name>
			<url>https://repo.spring.io/milestone</url>
		</repository>
	</repositories>
</project>
2.3 添加相关配置
2.3.1 本地git配置
2.3.1.1 appplication.properties
修改
application.properties,添加如下配置:#应用名称 spring.appliacion.name = spring-cloud-config-server #服务端口 server.port = 8080 #actuator配置 management.endpoints.enabled-by-default = false management.endpoint.env.enabled=true management.endpoint.health.enabled=true management.endpoint.info.enabled=true management.endpoints.web.exposure.include = env #spring cloud config配置 spring.cloud.config.server.git.uri = ${user.dir}/src/main/resources/configsgit.uri当然可以写绝对路径,但为了保证通用性建议使用${user.dir}。在IDEA环境下,user.dir为当前项目所在路径。
2.3.1.2 新建配置文件
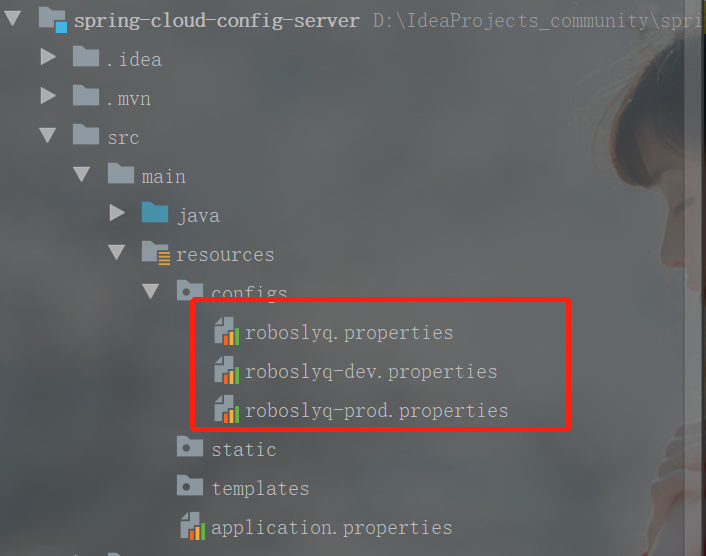
分别在每个配置文件中添加配置项
#default
roboslyq.user.name = roboslyq
#dev
roboslyq.user.name = roboslyq.dev
#prod
roboslyq.user.name = roboslyq.prod
2.3.1.3 添加到git控制
robos@ROBOSLYQ MINGW64 /d/IdeaProjects_community/spring-cloud-config-server/src/main/resources/configs
$ git init
Initialized empty Git repository in D:/IdeaProjects_community/spring-cloud-config-server/src/main/resources/configs/.git/

robos@ROBOSLYQ MINGW64 /d/IdeaProjects_community/spring-cloud-config-server/src/main/resources/configs (master)
$ git add .
warning: LF will be replaced by CRLF in roboslyq.properties.
The file will have its original line endings in your working directory

robos@ROBOSLYQ MINGW64 /d/IdeaProjects_community/spring-cloud-config-server/src/main/resources/configs (master)
$ git commit -m "spring cloud config demo"
[master (root-commit) e195202] spring cloud config demo
 3 files changed, 4 insertions(+)
 create mode 100644 roboslyq-dev.properties
 create mode 100644 roboslyq-prod.properties
 create mode 100644 roboslyq.properties

robos@ROBOSLYQ MINGW64 /d/IdeaProjects_community/spring-cloud-config-server/src/main/resources/configs (master)
2.3.1.4启动类启用配置中心
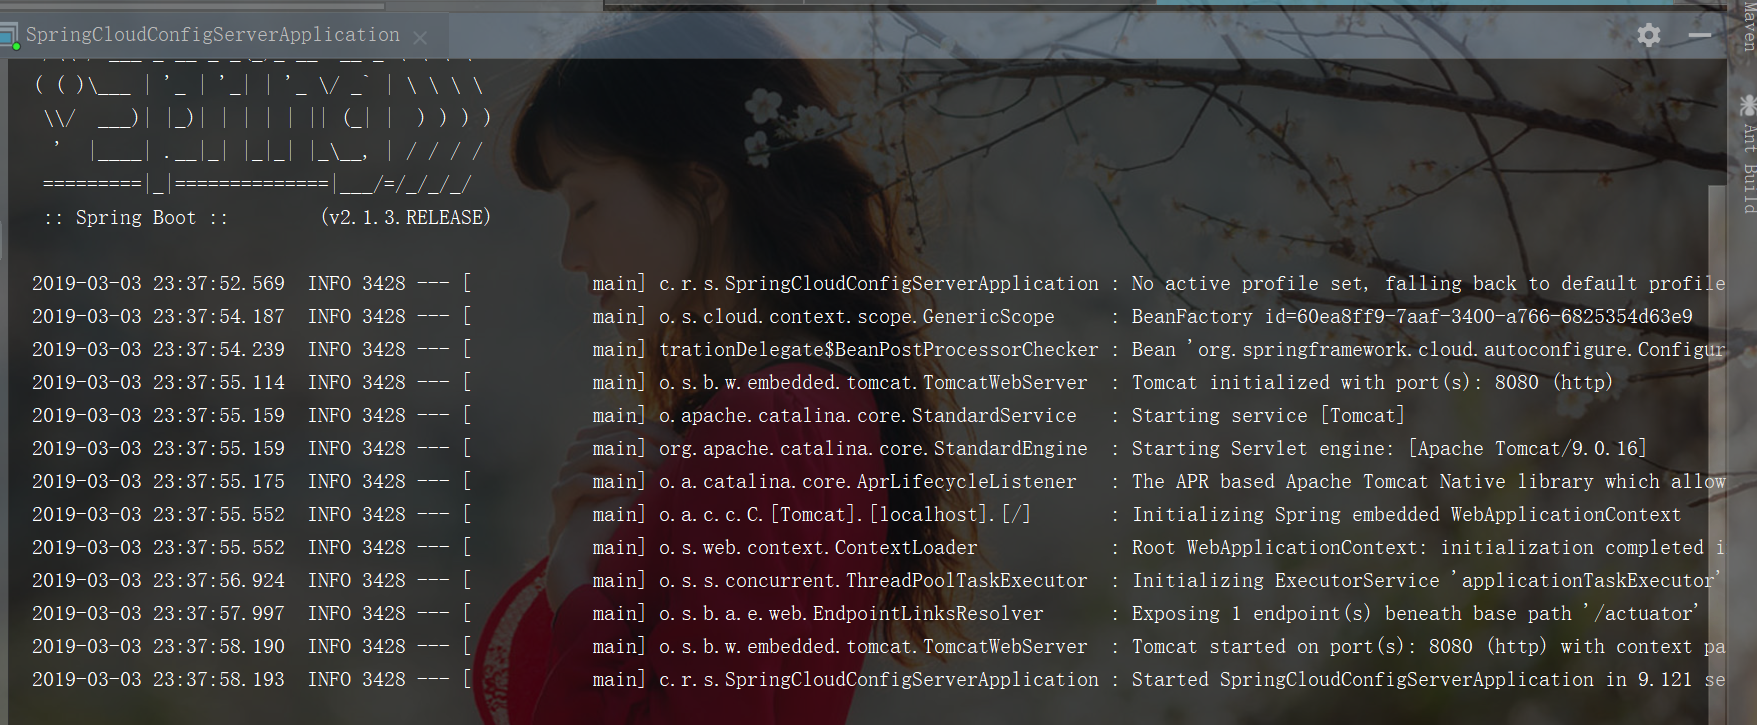
package com.roboslyq.springcloudconfigserver;
import org.springframework.boot.SpringApplication;
import org.springframework.boot.autoconfigure.SpringBootApplication;
import org.springframework.cloud.config.server.EnableConfigServer;
@SpringBootApplication
@EnableConfigServer
public class SpringCloudConfigServerApplication {
	public static void main(String[] args) {
		SpringApplication.run(SpringCloudConfigServerApplication.class, args);
	}
}
2.3.1.5 启动项目测试
2.3.1.6 浏览器测试
这个结果有点怪,配置文件中的Key和Value没有显示出来。但config-client可以正常获取相应配置。 我会在后面的config client证明这一点。
2.3.2 远程GIT配置
2.3.2.1 application.properties修改
将
spring.cloud.config.server.git.uri的值换成https://github.com/roboslyq/tmp.git。此前提是在自己的github上开立账号并且建立一个可以的仓库。#应用名称 spring.appliacion.name = spring-cloud-config-server #服务端口 server.port = 8080 #actuator配置 management.endpoints.enabled-by-default = false management.endpoint.env.enabled=true management.endpoint.health.enabled=true management.endpoint.info.enabled=true management.endpoints.web.exposure.include = env #spring cloud config配置 #spring.cloud.config.server.git.uri = ${user.dir}/src/main/resources/configs #配置config请求前缀,防止与其它请求冲突 spring.cloud.config.server.prefix = /config #github地址,可以添加用户名和密码 spring.cloud.config.server.git.uri = https://github.com/roboslyq/tmp.git #就否强制更新 spring.cloud.config.server.git.force-pull = true #更新频率 spring.cloud.config.server.git.refreshRate = 12.3.2.2远程仓库配置

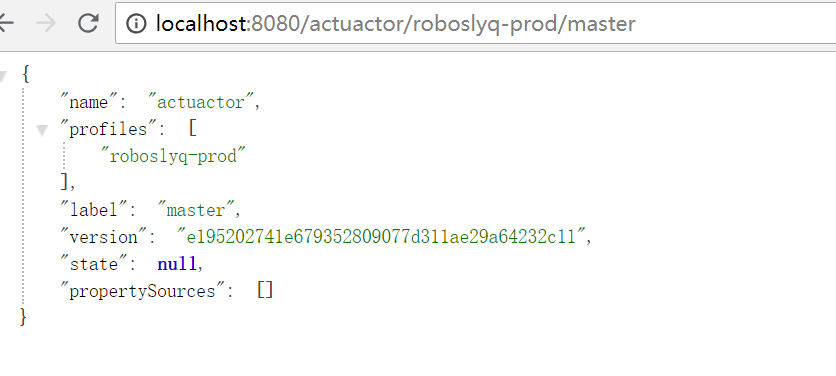
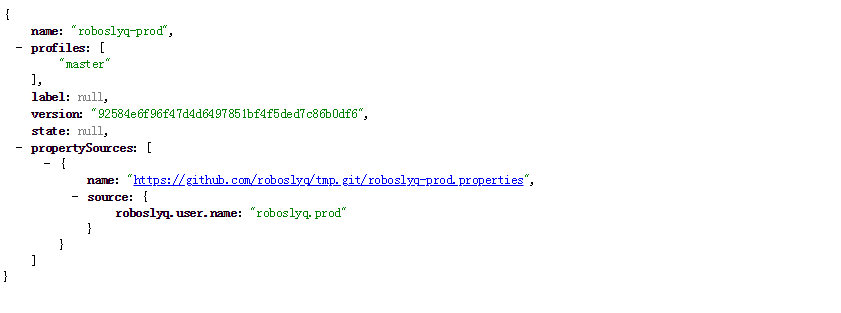
2.3.2.3 远程仓库测试
测试路径:http://localhost:8080/config/roboslyq-prod/master
测试结果如下:
3. Config Client环境搭建
3.1 创建项目
具体创建流程与config server一致,只是pom.xml依赖变化如下:
<!-- 配置中心服务器依赖-->
<dependency>
    <groupId>org.springframework.cloud</groupId>
    <artifactId>spring-cloud-config-server</artifactId>
</dependency>
客户端配置
<!-- 配置中心客户端依赖导入 -->
<dependency>
  <groupId>org.springframework.cloud</groupId>
  <artifactId>spring-cloud-starter-config</artifactId>
</dependency>
3.2 添加相关配置
3.2.1 修改application.properties
#应用名称
spring.appliacion.name = spring-cloud-client
#服务端口
server.port = 8082
#actuator配置
management.endpoints.enabled-by-default = false
management.endpoint.env.enabled=true
management.endpoint.refresh.enabled=true
management.endpoint.health.enabled=true
management.endpoint.info.enabled=true
management.endpoints.web.exposure.include = env,refresh
3.2.2 添加bootstrap.properties
spring.cloud.config.uri = http://localhost:8080/
spring.application.name = roboslyq
spring.profiles.active = prod,dev
spring.cloud.config.uri与config Server端的IP与端口相对应。
spring.application.name与config Server端维护的git仓库配置文件相对应。
spring.profiles.active是config Server维护的版本应用配置的版本应用。
config Server中配置的git路径下的配置文件与具体客户端应用的映射关系如下:
/{application}/{profile}[/{label}]
/{application}-{profile}.yml
/{label}/{application}-{profile}.yml
/{application}-{profile}.properties
/{label}/{application}-{profile}.properties
3.2.3 修改application.properties
package com.roboslyq.springcloudconfigclient;

import org.springframework.beans.factory.annotation.Autowired;
import org.springframework.beans.factory.annotation.Value;
import org.springframework.boot.SpringApplication;
import org.springframework.boot.autoconfigure.SpringBootApplication;
import org.springframework.core.env.Environment;
import org.springframework.web.bind.annotation.RequestMapping;
import org.springframework.web.bind.annotation.RestController;

@SpringBootApplication
@RestController
public class SpringCloudConfigClientApplication {
    //配置中心配置的变量名称
	@Value("${roboslyq.user.name}")
	private String userName;
	//从env中获取配置参数,可以实现参数动态更新
	@Autowired
	Environment environment;
	//模拟获取用户信息,返回一个字符串。
    //@valueName不能实现动态更新,需要重启服务器。environment.getProperty可以实现动态更新。
	@RequestMapping("/getUser")
	public String user() {
        String realTimeUserName = environment.getProperty("roboslyq.user.name");
		return "@valueName = "+userName+"<br/> envName = "+ realTimeUserName ;
	}
	public static void main(String[] args) {
		SpringApplication.run(SpringCloudConfigClientApplication.class, args);
	}
}