1. 前言
本系列文章主要是以环境搭建实操为主,后续会有单独的系列来分析具体的实现原理。
本篇是本系列的文章第一篇,因此讲得有点啰嗦,一些细节操作问题会有提到。后续文章会化繁为简,一些基本的
操作可以参考此篇文章。
2. config server端环境搭建
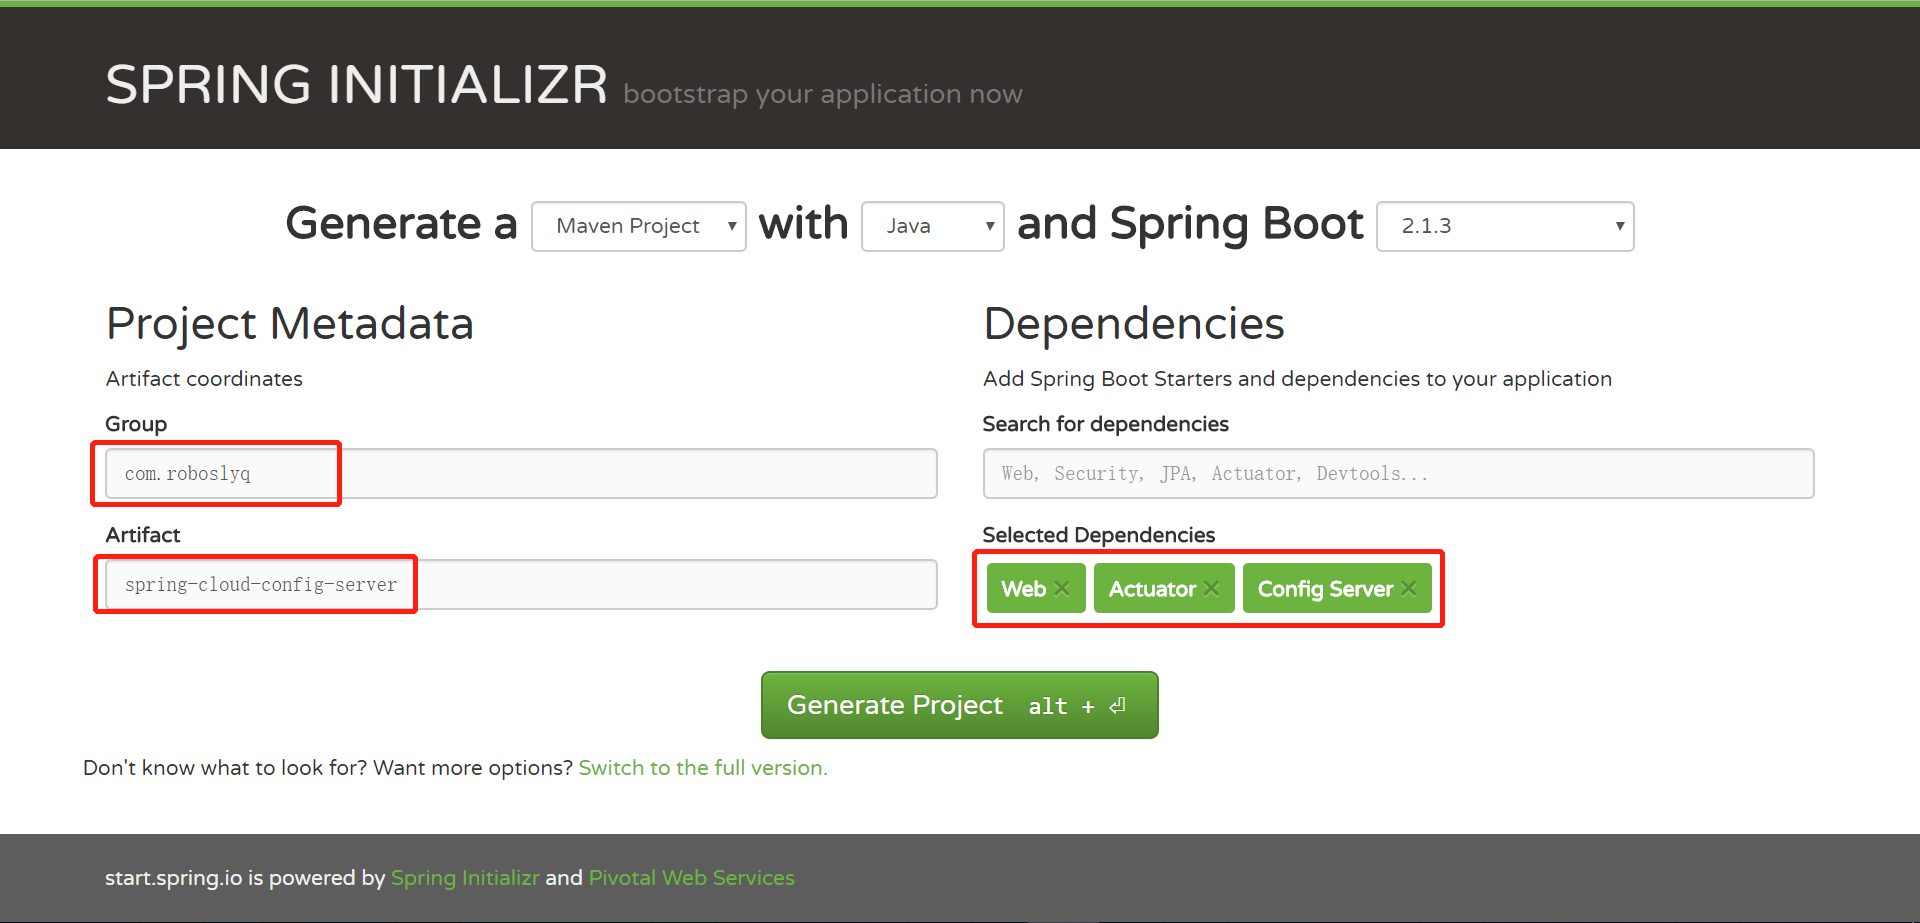
2.1 SPRING INITIALIZR
如果是从0开始搭建springBoot(springCloud基于springboot搭建)相关项目,强烈推荐SPRING INITIALIZR。打开网站,如下图所示:

Generate a XXX with YYY and Spring Boot ZZZ 其中XXX指使用Gradle还是Maven进行项目管理。YYY指创建的项目语言是Java,Kotlin或Groovy。ZZZ是指具体的Spring boot版本。 Spring boot版本一旦确定之后,其它相关依赖也相关确定了。
我们选择录入相关信息如下: Group = com.roboslyq Artifact = spring-cloud-config-server Dependencies = Web Actuator Config Server
最后点击”Generate Project”即可生成相应的项目。
2.2 导入IDEA
2.2.1 项目结构
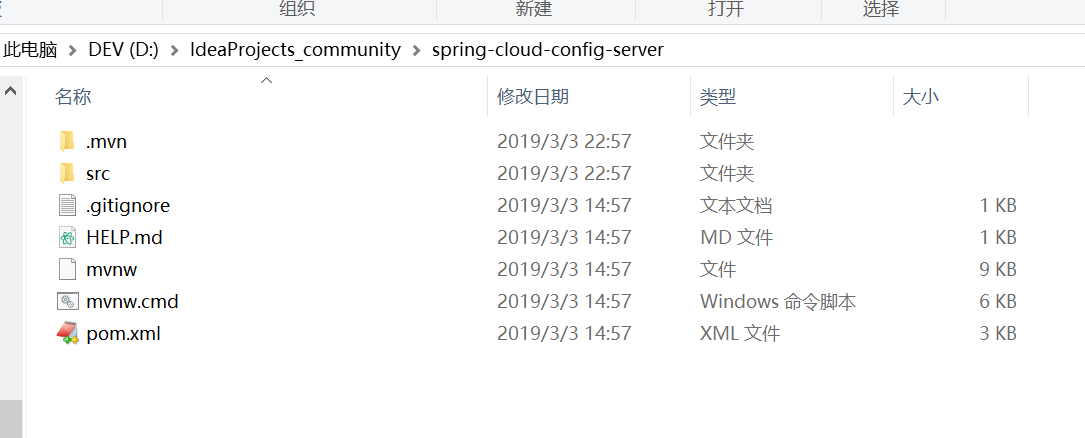
解压上面生成的压缩包,目录结构如下:
2.2.2 POM依赖
将其导入IDEA(在IDEA中直接打开pom.xml文件即可)
<?xml version="1.0" encoding="UTF-8"?>
<project xmlns="http://maven.apache.org/POM/4.0.0" xmlns:xsi="http://www.w3.org/2001/XMLSchema-instance"
	xsi:schemaLocation="http://maven.apache.org/POM/4.0.0 http://maven.apache.org/xsd/maven-4.0.0.xsd">
	<modelVersion>4.0.0</modelVersion>
	<!-- 标准的Spring boot项目 -->
	<parent>
		<groupId>org.springframework.boot</groupId>
		<artifactId>spring-boot-starter-parent</artifactId>
		<version>2.1.3.RELEASE</version>
		<relativePath/> <!-- lookup parent from repository -->
	</parent>
	<groupId>com.roboslyq</groupId>
	<artifactId>spring-cloud-config-server</artifactId>
	<version>0.0.1-SNAPSHOT</version>
	<name>spring-cloud-config-server</name>
	<description>Demo project for Spring Boot</description>
	<!-- 指定Java编译版本及SpringCloud版本 -->
	<properties>
		<java.version>1.8</java.version>
		<spring-cloud.version>Greenwich.RELEASE</spring-cloud.version>
	</properties>
	<dependencies>
		<!-- actuator依赖导入  -->
		<dependency>
			<groupId>org.springframework.boot</groupId>
			<artifactId>spring-boot-starter-actuator</artifactId>
		</dependency>
		<!-- spring mvc导入-->
		<dependency>
			<groupId>org.springframework.boot</groupId>
			<artifactId>spring-boot-starter-web</artifactId>
		</dependency>
		<!-- 配置中心服务器依赖-->
		<dependency>
			<groupId>org.springframework.cloud</groupId>
			<artifactId>spring-cloud-config-server</artifactId>
		</dependency>
		<dependency>
			<groupId>org.springframework.boot</groupId>
			<artifactId>spring-boot-starter-test</artifactId>
			<scope>test</scope>
		</dependency>
	</dependencies>
	<dependencyManagement>
		<dependencies>
			<dependency>
				<groupId>org.springframework.cloud</groupId>
				<artifactId>spring-cloud-dependencies</artifactId>
				<version>${spring-cloud.version}</version>
				<type>pom</type>
				<scope>import</scope>
			</dependency>
		</dependencies>
	</dependencyManagement>
	<build>
		<plugins>
			<plugin>
				<groupId>org.springframework.boot</groupId>
				<artifactId>spring-boot-maven-plugin</artifactId>
			</plugin>
		</plugins>
	</build>
	<repositories>
		<repository>
			<id>spring-milestones</id>
			<name>Spring Milestones</name>
			<url>https://repo.spring.io/milestone</url>
		</repository>
	</repositories>
</project>
2.3 添加相关配置
2.3.1 本地git配置
2.3.1.1 appplication.properties
修改application.properties,添加如下配置:
#应用名称
spring.appliacion.name = spring-cloud-config-server
#服务端口
server.port = 8080
#actuator配置
management.endpoints.enabled-by-default = false
management.endpoint.env.enabled=true
management.endpoint.health.enabled=true
management.endpoint.info.enabled=true
management.endpoints.web.exposure.include = env
#spring cloud config配置
spring.cloud.config.server.git.uri = ${user.dir}/src/main/resources/configs
git.uri当然可以写绝对路径,但为了保证通用性建议使用${user.dir}。在IDEA环境下,user.dir为当前项目所在路径。
2.3.1.2 新建配置文件
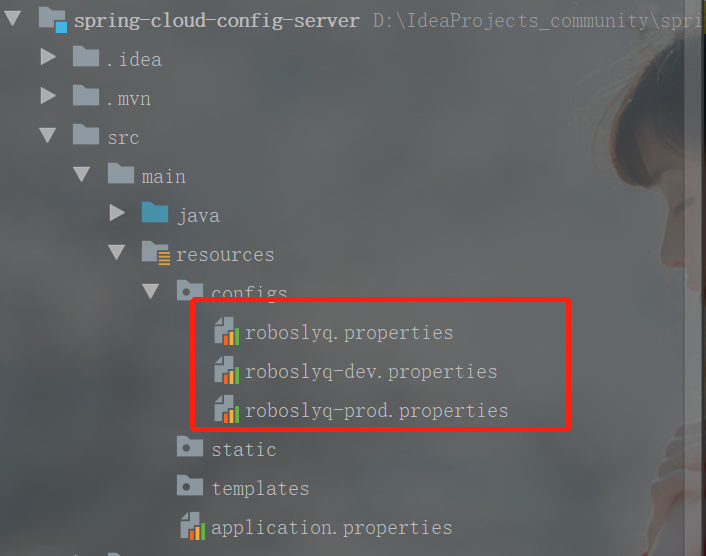
分别在每个配置文件中添加配置项
#default
roboslyq.user.name = roboslyq
#dev
roboslyq.user.name = roboslyq.dev
#prod
roboslyq.user.name = roboslyq.prod
2.3.1.3 添加到git控制
robos@ROBOSLYQ MINGW64 /d/IdeaProjects_community/spring-cloud-config-server/src/main/resources/configs
$ git init
Initialized empty Git repository in D:/IdeaProjects_community/spring-cloud-config-server/src/main/resources/configs/.git/

robos@ROBOSLYQ MINGW64 /d/IdeaProjects_community/spring-cloud-config-server/src/main/resources/configs (master)
$ git add .
warning: LF will be replaced by CRLF in roboslyq.properties.
The file will have its original line endings in your working directory

robos@ROBOSLYQ MINGW64 /d/IdeaProjects_community/spring-cloud-config-server/src/main/resources/configs (master)
$ git commit -m "spring cloud config demo"
[master (root-commit) e195202] spring cloud config demo
 3 files changed, 4 insertions(+)
 create mode 100644 roboslyq-dev.properties
 create mode 100644 roboslyq-prod.properties
 create mode 100644 roboslyq.properties

robos@ROBOSLYQ MINGW64 /d/IdeaProjects_community/spring-cloud-config-server/src/main/resources/configs (master)
2.3.1.4启动类启用配置中心
package com.roboslyq.springcloudconfigserver;
import org.springframework.boot.SpringApplication;
import org.springframework.boot.autoconfigure.SpringBootApplication;
import org.springframework.cloud.config.server.EnableConfigServer;
@SpringBootApplication
@EnableConfigServer
public class SpringCloudConfigServerApplication {
	public static void main(String[] args) {
		SpringApplication.run(SpringCloudConfigServerApplication.class, args);
	}
}
2.3.1.5 启动项目测试
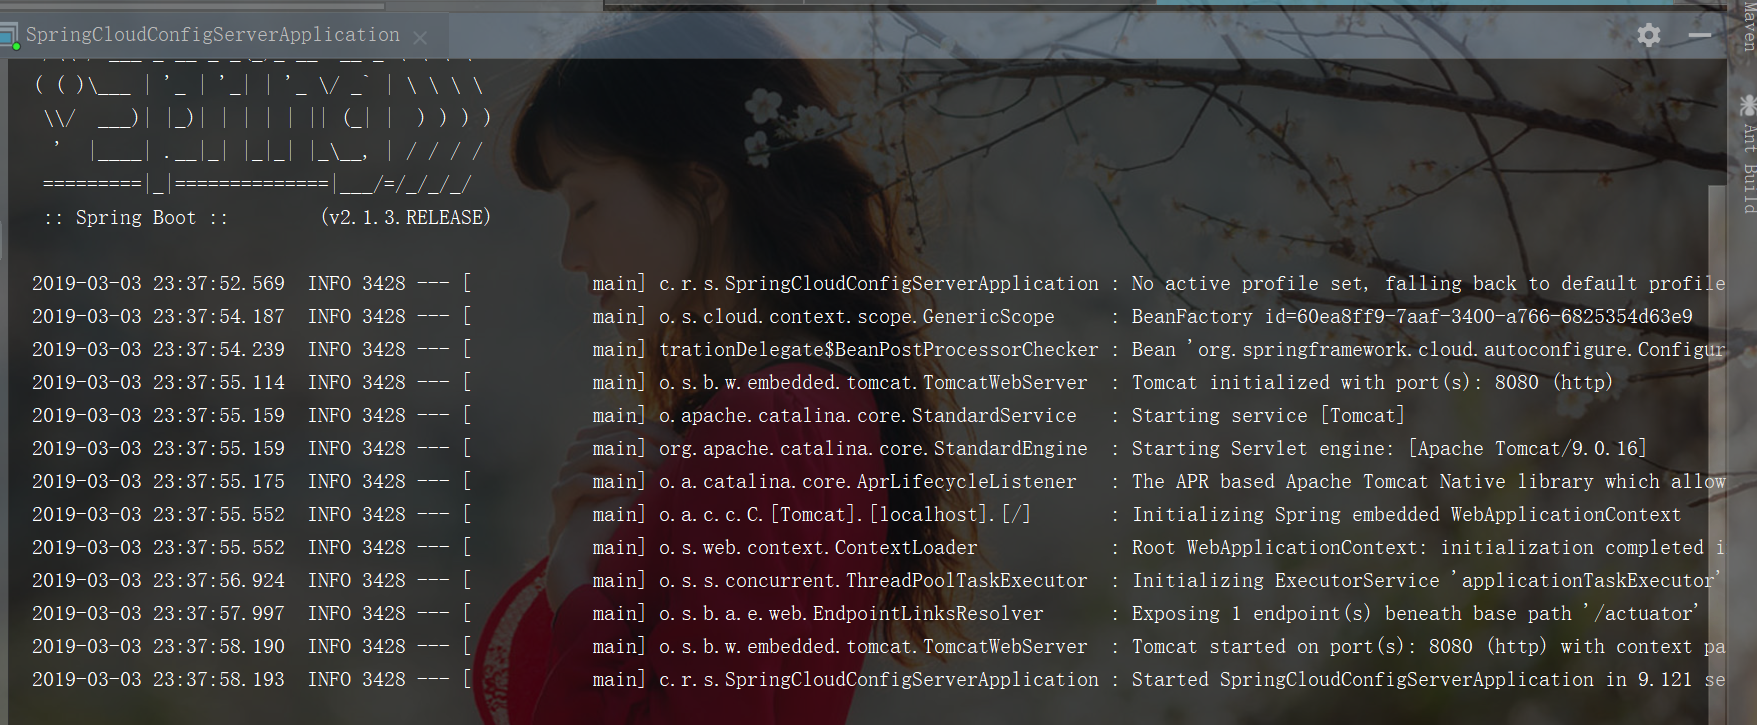
2.3.1.6 浏览器测试
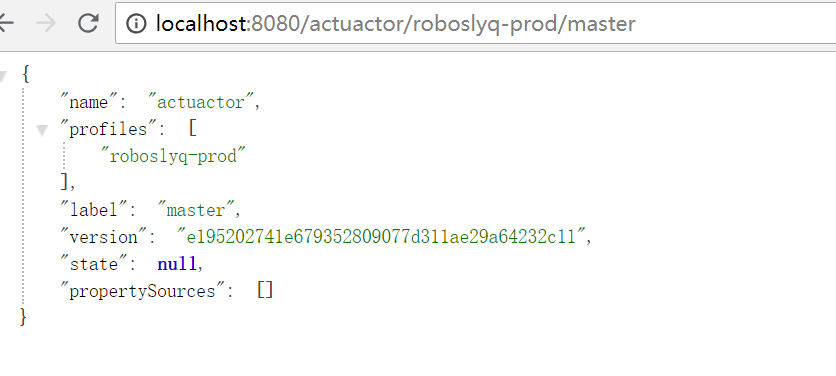
这个结果有点怪,配置文件中的Key和Value没有显示出来。但config-client可以正常获取相应配置。 我会在后面的config client证明这一点。
2.3.2 远程GIT配置
2.3.2.1 application.properties修改
将spring.cloud.config.server.git.uri的值换成https://github.com/roboslyq/tmp.git。此前提是在自己的github上开立账号并且建立一个可以的仓库。
#应用名称
spring.appliacion.name = spring-cloud-config-server
#服务端口
server.port = 8080
#actuator配置
management.endpoints.enabled-by-default = false
management.endpoint.env.enabled=true
management.endpoint.health.enabled=true
management.endpoint.info.enabled=true
management.endpoints.web.exposure.include = env

#spring cloud config配置
#spring.cloud.config.server.git.uri = ${user.dir}/src/main/resources/configs
#配置config请求前缀,防止与其它请求冲突
spring.cloud.config.server.prefix = /config
#github地址,可以添加用户名和密码
spring.cloud.config.server.git.uri = https://github.com/roboslyq/tmp.git
#就否强制更新
spring.cloud.config.server.git.force-pull = true
#更新频率
spring.cloud.config.server.git.refreshRate = 1
2.3.2.2远程仓库配置

2.3.2.3 远程仓库测试
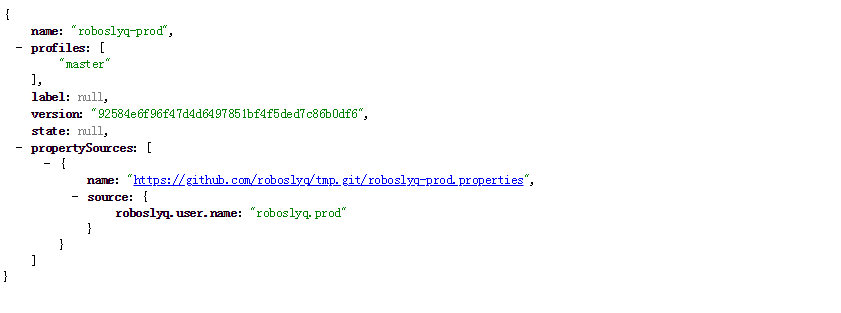
测试路径:http://localhost:8080/config/roboslyq-prod/master
测试结果如下:
3. Config Client环境搭建
3.1 创建项目
具体创建流程与config server一致,只是pom.xml依赖变化如下:
<!-- 配置中心服务器依赖-->
<dependency>
    <groupId>org.springframework.cloud</groupId>
    <artifactId>spring-cloud-config-server</artifactId>
</dependency>
客户端配置
<!-- 配置中心客户端依赖导入 -->
<dependency>
  <groupId>org.springframework.cloud</groupId>
  <artifactId>spring-cloud-starter-config</artifactId>
</dependency>
3.2 添加相关配置
3.2.1 修改application.properties
#应用名称
spring.appliacion.name = spring-cloud-client
#服务端口
server.port = 8082
#actuator配置
management.endpoints.enabled-by-default = false
management.endpoint.env.enabled=true
management.endpoint.refresh.enabled=true
management.endpoint.health.enabled=true
management.endpoint.info.enabled=true
management.endpoints.web.exposure.include = env,refresh
3.2.2 添加bootstrap.properties
spring.cloud.config.uri = http://localhost:8080/
spring.application.name = roboslyq
spring.profiles.active = prod,dev
spring.cloud.config.uri与config Server端的IP与端口相对应。
spring.application.name与config Server端维护的git仓库配置文件相对应。
spring.profiles.active是config Server维护的版本应用配置的版本应用。
config Server中配置的git路径下的配置文件与具体客户端应用的映射关系如下:
/{application}/{profile}[/{label}]
/{application}-{profile}.yml
/{label}/{application}-{profile}.yml
/{application}-{profile}.properties
/{label}/{application}-{profile}.properties
3.2.3 修改application.properties
package com.roboslyq.springcloudconfigclient;

import org.springframework.beans.factory.annotation.Autowired;
import org.springframework.beans.factory.annotation.Value;
import org.springframework.boot.SpringApplication;
import org.springframework.boot.autoconfigure.SpringBootApplication;
import org.springframework.core.env.Environment;
import org.springframework.web.bind.annotation.RequestMapping;
import org.springframework.web.bind.annotation.RestController;

@SpringBootApplication
@RestController
public class SpringCloudConfigClientApplication {
    //配置中心配置的变量名称
	@Value("${roboslyq.user.name}")
	private String userName;
	//从env中获取配置参数,可以实现参数动态更新
	@Autowired
	Environment environment;
	//模拟获取用户信息,返回一个字符串。
    //@valueName不能实现动态更新,需要重启服务器。environment.getProperty可以实现动态更新。
	@RequestMapping("/getUser")
	public String user() {
        String realTimeUserName = environment.getProperty("roboslyq.user.name");
		return "@valueName = "+userName+"<br/> envName = "+ realTimeUserName ;
	}
	public static void main(String[] args) {
		SpringApplication.run(SpringCloudConfigClientApplication.class, args);
	}
}
3.3 启动测试
浏览器访问路径:http://localhost:8082/actuator/env
结果如下:
{
"activeProfiles": [
"prod",
"dev"
],
"propertySources": [
{
"name": "server.ports",
"properties": {
"local.server.port": {
"value": 8082
}
}
},
{
"name": "configService:configClient",
"properties": {
"config.client.version": {
"value": "e195202741e679352809077d311ae29a64232c11"
}
}
},
{
"name": "configService:D:\\IdeaProjects_community\\spring-cloud-config-server/src/main/resources/configs/roboslyq-dev.properties",
"properties": {
"roboslyq.user.name": {
"value": "roboslyq.dev"
}
}
},
{
"name": "configService:D:\\IdeaProjects_community\\spring-cloud-config-server/src/main/resources/configs/roboslyq-prod.properties",
"properties": {
"roboslyq.user.name": {
"value": "roboslyq.prod"
}
}
},
{
"name": "configService:D:\\IdeaProjects_community\\spring-cloud-config-server/src/main/resources/configs/roboslyq.properties",
"properties": {
"roboslyq.user.name": {
"value": "roboslyq"
}
}
}
}
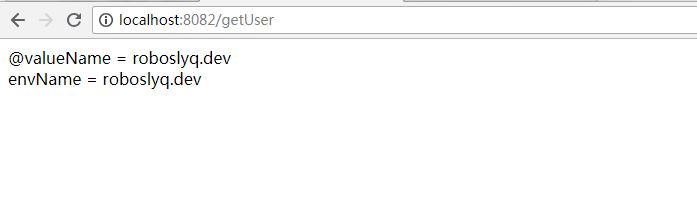
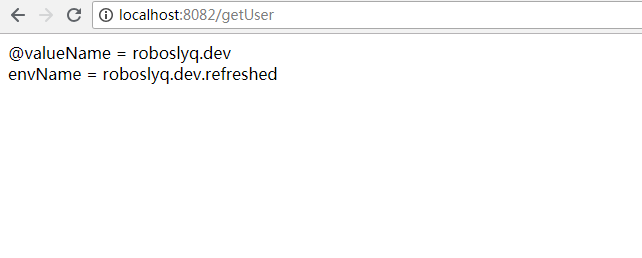
访问路径:http://localhost:8082/getUser
结果如下:
4. Config Client自动更新
4.1 手动刷新
此刷新依赖于actuator框架。上面讲述的例子已经引入了此框架。依赖引入如下:
<!-- actuator依赖导入  -->
<dependency>
    <groupId>org.springframework.boot</groupId>
    <artifactId>spring-boot-starter-actuator</artifactId>
</dependency>
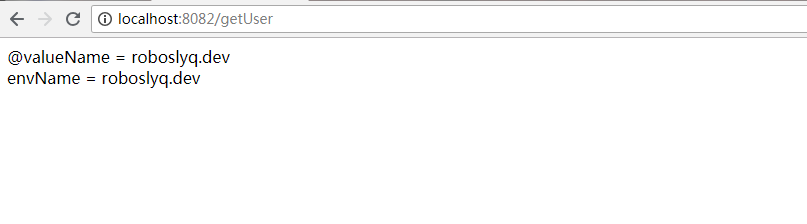
刷新之前,参数结果如下:
当Git的配置文件更新后
roboslyq.user.name = roboslyq.dev.refreshed
再执行刷新操作:
-
请求路径 http://localhost:8082/actuator/refresh
-
请求方式 POST
-
工具 Postman
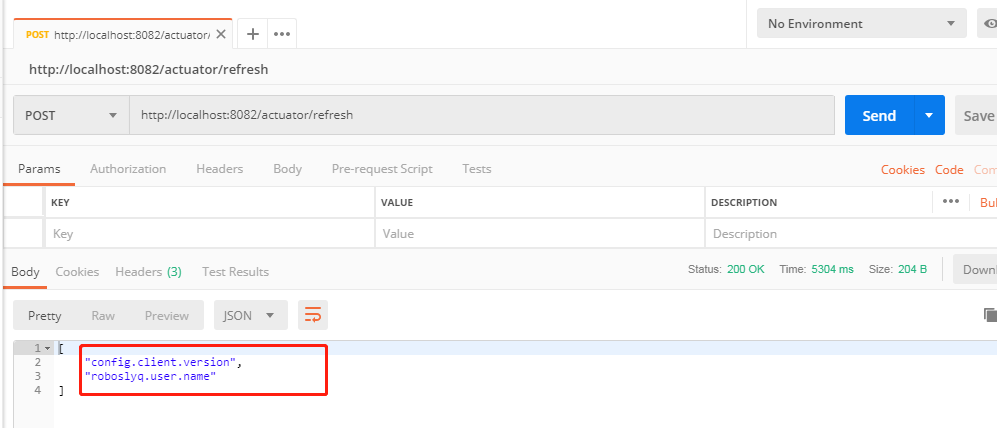
刷新后结果如下:
4.2 定时任务刷新
4.2.1 原理分析
此原理十分简单,即将上面的路径 http://localhost:8082/actuator/refresh包装为定时任务执行即可。
我们通过RefreshEndpoint找到上述请求对应的源码信息:
package org.springframework.cloud.endpoint;
import java.util.Collection;
import java.util.Set;
import org.springframework.boot.actuate.endpoint.annotation.Endpoint;
import org.springframework.boot.actuate.endpoint.annotation.WriteOperation;
import org.springframework.cloud.context.refresh.ContextRefresher;
/**
 * @author Dave Syer
 * @author Venil Noronha
 */
@Endpoint(id = "refresh")
public class RefreshEndpoint {
    //刷新器
	private ContextRefresher contextRefresher;
    //构造器注入刷新器
	public RefreshEndpoint(ContextRefresher contextRefresher) {
		this.contextRefresher = contextRefresher;
	}
	@WriteOperation
	public Collection<String> refresh() {
        //执行刷新操作
		Set<String> keys = contextRefresher.refresh();
		return keys;
	}
}
从源码可以,刷新操作是通过ContextRefresher.refresh()来实现的。
4.2.2 代码改造
所以我们将上述请求包装为自动任务执行:
package com.roboslyq.springcloudconfigclient;

import org.springframework.beans.factory.annotation.Autowired;
import org.springframework.beans.factory.annotation.Value;
import org.springframework.boot.SpringApplication;
import org.springframework.boot.autoconfigure.SpringBootApplication;
import org.springframework.cloud.context.refresh.ContextRefresher;
import org.springframework.core.env.Environment;
import org.springframework.scheduling.annotation.EnableScheduling;
import org.springframework.scheduling.annotation.Scheduled;
import org.springframework.web.bind.annotation.RequestMapping;
import org.springframework.web.bind.annotation.RestController;
import java.util.Set;
@SpringBootApplication
//开启定时任务
@EnableScheduling
@RestController
public class SpringCloudConfigClientApplication {
    //注入刷新器
	@Autowired
	private ContextRefresher contextRefresher;

	private int count = 0;
	//每100ms执行一次刷新
	@Scheduled(fixedRate = 100)
	private void refreshedConfig(){
		System.out.println("第" + count++ +"次更新配置");
        //刷新配置
		Set<String> keys = contextRefresher.refresh();
		System.out.println(keys.toString());
	}
	@Value("${roboslyq.user.name}")
	private String userName;

	@Autowired
	Environment environment;

	@RequestMapping("/getUser")
	public String user() {
        String realTimeUserName = environment.getProperty("roboslyq.user.name");
		return "@valueName = "+userName+"<br/> envName = "+ realTimeUserName ;
	}
	public static void main(String[] args) {
		SpringApplication.run(SpringCloudConfigClientApplication.class, args);
	}

}
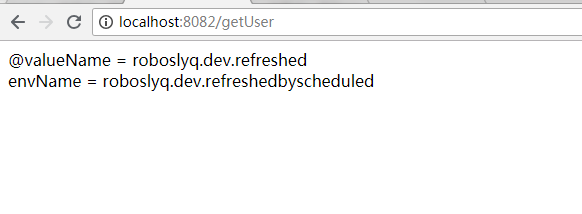
4.2.3 GIT配置文件更新
roboslyq.user.name = roboslyq.dev.refreshedbyscheduled
4.2.3 控制台日志分析
第37次更新配置
2019-03-04 23:27:41.107  INFO 6188 --- [   scheduling-1] trationDelegate$BeanPostProcessorChecker : Bean 'org.springframework.cloud.autoconfigure.ConfigurationPropertiesRebinderAutoConfiguration' of type [org.springframework.cloud.autoconfigure.ConfigurationPropertiesRebinderAutoConfiguration$$EnhancerBySpringCGLIB$$429b4846] is not eligible for getting processed by all BeanPostProcessors (for example: not eligible for auto-proxying)
2019-03-04 23:27:41.409  INFO 6188 --- [   scheduling-1] c.c.c.ConfigServicePropertySourceLocator : Fetching config from server at : http://localhost:8080/config
2019-03-04 23:27:55.430  INFO 6188 --- [   scheduling-1] c.c.c.ConfigServicePropertySourceLocator : Located environment: name=roboslyq, profiles=[prod,dev], label=null, version=f1c880b132d9387a215ad386113fd73efaaba724, state=null
2019-03-04 23:27:55.430  INFO 6188 --- [   scheduling-1] b.c.PropertySourceBootstrapConfiguration : Located property source: CompositePropertySource {name='configService', propertySources=[MapPropertySource {name='configClient'}, MapPropertySource {name='https://github.com/roboslyq/tmp.git/roboslyq-dev.properties'}, MapPropertySource {name='https://github.com/roboslyq/tmp.git/roboslyq-prod.properties'}, MapPropertySource {name='https://github.com/roboslyq/tmp.git/roboslyq.properties'}]}
2019-03-04 23:27:55.431  INFO 6188 --- [   scheduling-1] o.s.boot.SpringApplication               : The following profiles are active: prod,dev
2019-03-04 23:27:55.438  INFO 6188 --- [   scheduling-1] o.s.boot.SpringApplication               : Started application in 14.668 seconds (JVM running for 249.036)
[config.client.version, roboslyq.user.name]
第38次更新配置
2019-03-04 23:27:55.806  INFO 6188 --- [   scheduling-1] trationDelegate$BeanPostProcessorChecker : Bean 'org.springframework.cloud.autoconfigure.ConfigurationPropertiesRebinderAutoConfiguration' of type [org.springframework.cloud.autoconfigure.ConfigurationPropertiesRebinderAutoConfiguration$$EnhancerBySpringCGLIB$$429b4846] is not eligible for getting processed by all BeanPostProcessors (for example: not eligible for auto-proxying)
2019-03-04 23:27:56.123  INFO 6188 --- [   scheduling-1] c.c.c.ConfigServicePropertySourceLocator : Fetching config from server at : http://localhost:8080/config
2019-03-04 23:27:57.844  INFO 6188 --- [   scheduling-1] c.c.c.ConfigServicePropertySourceLocator : Located environment: name=roboslyq, profiles=[prod,dev], label=null, version=f1c880b132d9387a215ad386113fd73efaaba724, state=null
2019-03-04 23:27:57.844  INFO 6188 --- [   scheduling-1] b.c.PropertySourceBootstrapConfiguration : Located property source: CompositePropertySource {name='configService', propertySources=[MapPropertySource {name='configClient'}, MapPropertySource {name='https://github.com/roboslyq/tmp.git/roboslyq-dev.properties'}, MapPropertySource {name='https://github.com/roboslyq/tmp.git/roboslyq-prod.properties'}, MapPropertySource {name='https://github.com/roboslyq/tmp.git/roboslyq.properties'}]}
2019-03-04 23:27:57.845  INFO 6188 --- [   scheduling-1] o.s.boot.SpringApplication               : The following profiles are active: prod,dev
2019-03-04 23:27:57.852  INFO 6188 --- [   scheduling-1] o.s.boot.SpringApplication               : Started application in 2.382 seconds (JVM running for 251.45)
[]
上面是部分日志,因为系统是一直在运行的,所以在第几次更新的配置文件不确定。从上面的日志可知在第37次时更新到了配置文件。
4.2.4 浏览器验证
4.3 注解@RefreshScope刷新
TODO